MARCEE Minnesota Area R/C Electric Flight Enthusiasts
This Article is presented by MARCEE With permission of Bill Kubiak Originally presented in R/C Soaring Digest Oct '92 The text has been manually transcribed and the illustrations scanned and reproduced from Soaring Digest Oct 1992 |
Carving Helical Pitch Propellers
By Bill Kubiak Minnetonka, Minnesota
In this article on carving helical pitch propellers, I'll give the method for carving any size and pitch propeller and at the same time will give an example for one propeller to illustrate the method.
I learned this method of carving propellers with helical pitch from Fred Youngren when we were both in Los Angeles in 1947. (We needed a lot of propellers when we were flying free flight.) When I first got into electrics in 1978 there wasn't much information available about propellers for electrics, especially geared or belted versions, so I carved a whole family of propellers before I found the best diameter and pitch for my motor and model.
I believe everyone should carve at least one helical pitch propeller, if for no other reason than to see how the helix is developed on the back side of the propeller. This will help in evaluating store bought propellers.
I view propellers as frangible fuses that break before the motor burns out. I have carved propellers for direct drive 05 motors running in the 12,000 rpm range out of pine, spruce, mahogany, basswood, aspen (poplar) and maple. I prefer aspen or white pine. The others are two grainy or too hard. All of the propellers for belt drive 05 motors running at 5,000 rpm or so have been carved from balsa. The balsa ranges from very soft to firm/hard.
Despite popular legend about the need for great strength in propeller blades, I have never had a balsa prop fail from flight loads when used with an electric motor. Even the softest balsa, which has been so soft that it is almost impossible to carve, has held up to flight loads.
On impact, the soft balsa shatters with nice clean breaks across the blade. I pick up all the pieces and Hot Stuff@ them back together, sand off the rough glue, put a coat of sanding sealer on the light blade, sand the whole propeller down a little, and I'm ready to goo again. The hard/firm balsa tends to splinter when it breaks. The splintered ends are difficult to put back together again, so I have quit using the heaviest balsa for propellers. Most of the balsa I use now is about midway between soft and hard. It carves nicely, takes a good finish with minimum work and breaks clean.
Despite the fact that I have a Shopsmith@, I don't use power tools to make propellers except for the prop-shaft hole which is done on a drill press. I prefer to carve propellers with a jackknife. I have a Case@ jackknife that has a large handle for a comfortable grip, and a long straight blade (about 3 1/2" long by 1/2" wide). I sharpen it on a smooth yellow stone to keep it s0 sharp that I can carve even the softest balsa. I use a sanding board (about 1/2" X 1 1/2" X 20") with 4 strips of sandpaper glued to it (80, 120, 240, 400 grit) and use it for all sanding except for the hollow on the back side of the blade next to the hub.
So, to get down to it ….,
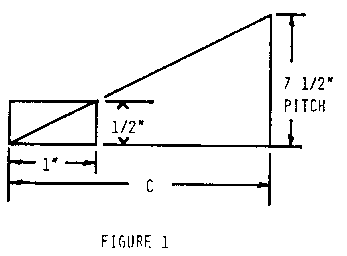
One: Pick a diameter and pitch. For our example, assume an 11" diameter and a pitch of 7 1/2".
Two: Pick a suitable piece of wood from which to carve the propeller. The piece I've chosen as the example is 11" long by one inch wide by 1/2" thick.
Three: Draw an end view of the block on a sheet of paper and put in the diagonal. Extend the diagonal and label the pitch as shown in Figure 1.
The propeller advances along the diagonal as it turns. It would travel the distance "C" while advancing 7 1/2".
Calculate C:
C = pitch x with / thickness
C = 7.5 x 1.00 / 0.5 = 15"
The distance C is a circumference. Divide C by pi(pi=3.14)to get a diameter. Divide the result by two to get the radius.
Radius = c/2 X pi = 15/2 X3.14 =2.39
This means that at a radius of 2.39" from the propeller shaft, the diagonal of the propeller block will advance 7 1/2" in each revolution. You will also see that for 7 1/2" of pitch the thickness will decrease to 1/2T (1/4") at twice the radius, it will decrease to 1/3T (1/6") at three times the radius, etc. Backing up, it will increase to 2T(1") at 1/2 the radius.
Four: Draw the shape of the leading edge as seen on the side view of the block (Figure 2). Do this for both blades. Think about what you are doing so that you lay our a right hand rotation propeller on both blades. (Doesn't this sound like I've been there?)
This may look complicated but I's not. I calculate T at one radius and 1/2T at two radii. I draw the curve as an almost straight line with about 1/16" bow in it.
Five: Lay out the propeller on the front face of the block, as shown in Figure 3.
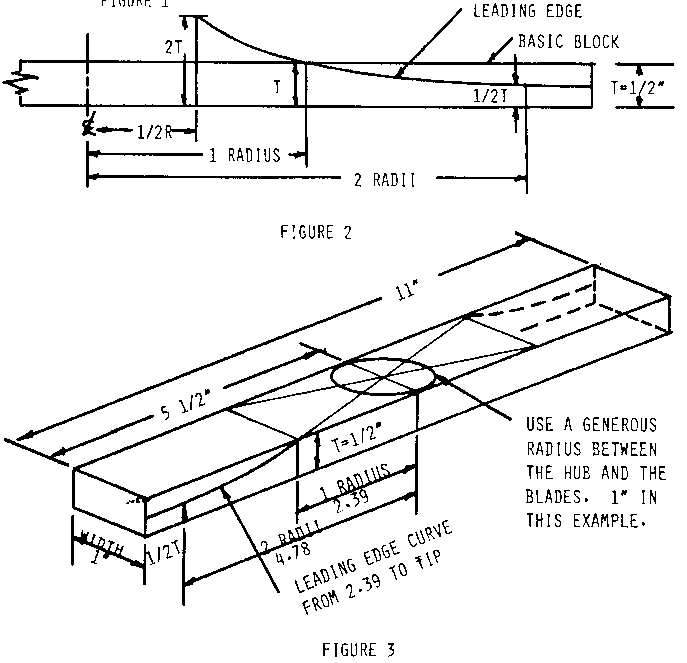
It should be noted that the final shape of the propeller depends to some extent upon the dimensions of the block chosen. As long as the length of the block of wood is equal to or greater than the diameter of the finished propeller, any size piece of wood can be used. However, as can be seen in Figure 4, choosing dimensional extremes can result in inefficient, nonstandard, weird or just plain dum blade shapes.
Six: Cut out the hub area with a coping saw or a band saw and then drill the propeller shaft hole (Figure 5). Cut the leading edge curve now. Make the cut at about 45 degrees. Don't cut the block off level; you won't have enough wood left for decent leading edge thickness.
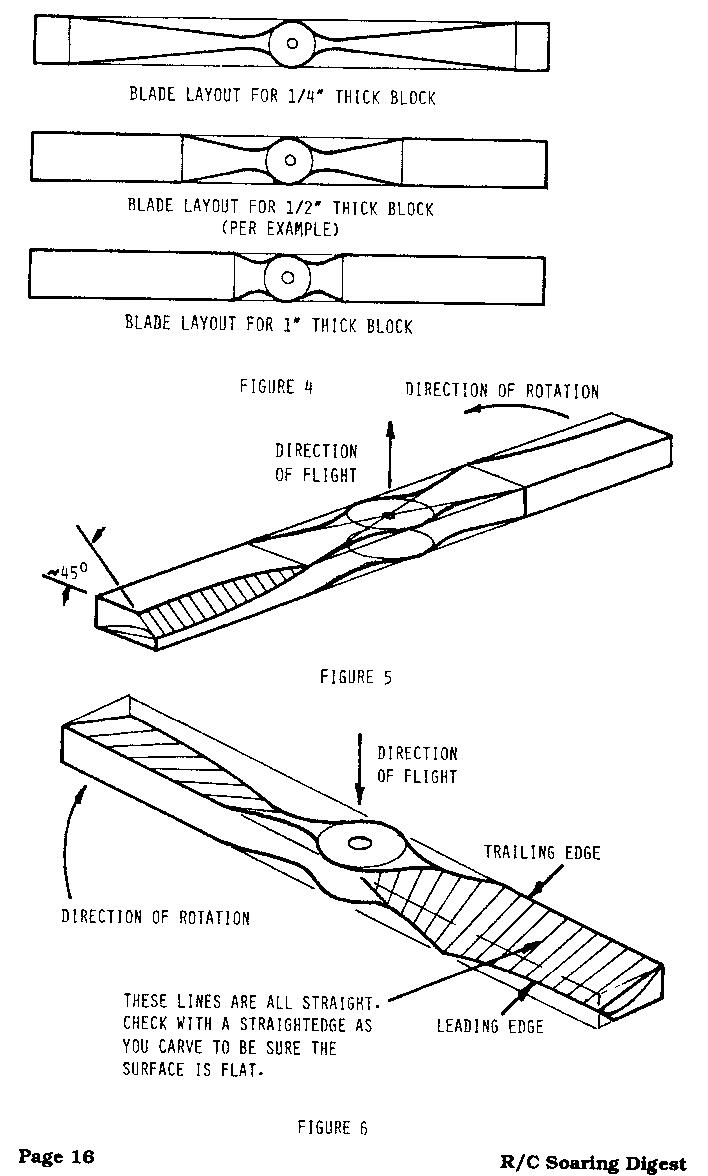
Seven: Turn the block over and carve the back side of the propeller. Carve from the trailing edge diagonally to the leading edge. See Figure 6. This gives the helical twist to the blades that we have been working so hard to get.
Getting the helical twist in the back side of the blade is probably the important part of carving a propeller. Take you time and get it right. Use the Michelangelo technique of sculpting. He took a block of marble and carved away everything that didn't look like a "pieta" or a "David". The same technique works with wooden propellers.
Eight: Turn the block over and very roughly carve the front face to sort of airfoil shape (within 1/16" or 1/8" or so).
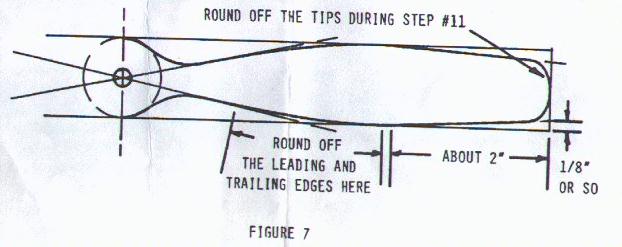
Nine: Carve the blade shape, but wait until Step Eleven to round the tips.
There is nothing special about the blade shape shown in Figure 7 - I just like it. You can put any other shape on that you may prefer
 |
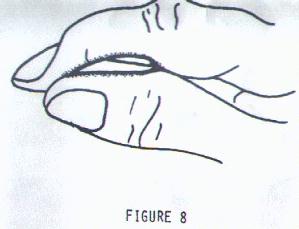 |
Ten: Finish carving the airfoil sections of the blades. Since the bottom of the blade is flat, the airfoil sections turn out to be "Clark Y" sections. Don't carve the trailing edge too thin. I try to get a finish edge about 1/32" thick, so for the first pass try to keep the trailing edge about 1/16" thick. You can check the airfoil section of the blade at any station by holding the blade between your thumb and forefinger as shown in Figure 8.
Look In past the tip at the shadow between the blade and you finger and you will be able to see the airfoil shape.
Slide your fingers along the blade while you look in and observe how the airfoil sections look and twist along the blade.
For some reason the blade sections tend to be too thick. Keep looking in at the blade sections and then thin them down to about 10% thick, at least on the outer half of the blade. On the inner portion of the blade a compromise must be made. Thicken the blades so that they blend smoothly into the hub and have the strength to take the usual abuse.
Eleven: Put the rough carved propeller on a High Point@ or similar balancer. Look at the heavier blade and remove the thicker portions nearer the tips that really don't look like a propeller. Start sanding the blades to a final shape, keep checking balance on the High Point@. When you are satisfied that the propeller is reasonably balance and both blades look alike, round off the tips to your favorite shape and finish balancing. The balance doesn't have to be perfect because the next step is to put on a coat of sanding sealer. Let it dry and sand it down to a smooth stubble-free finish. Balance on the High Point@ and put a coat of sanding sealer on the light blade. At this point I'm finish with the propeller.
Please note that I have steered away from exotic blade shapes, airfoil sections, pitch distributions, and all that other high tech stuff. Whenever I feel the need for something inspirational I pull out my old copy "Airplane Design" by K.D. Woods open it to the cahpter on wing desing and read, "Anything that looks like a wing will perform almost as well as the best wing". (Fred) Weick has reached the same conclusion regarding propellers.